
CONVERTING ANDROID PROJECT INTO APK FILE IN ECLIPSE LUNA
 So many of you must be developing something great and powerful as a beginner but you are worried about how to convert your android project into an APK file. I know it is the most basic part which makes your app useful and it sounds easy, but many game creation software doesn't export your project directly into an APK file, they just export the Android Project Files with resources and all your stuff in it separately. APK is what makes everything one and enable your Android to read that and install that as an application. And so, without getting any further, here we begin.
INTRODUCTION
Here i will be using Eclipse Luna (android application maker tool by oracle). You might have heard about Android Studio by Google but it is a heavy tool and is a bit complicated for beginners though the future will be based on it after all but always start with the basics.
STEP ONE
Okay, first of all, locate your Android Project folder and create another folder inside it and name it as 'WorkSpace" or any other name you like. Do not create the folder where your data and resources of your project are located, outside of that folder BUT along with the folder in which your data is stored.

STEP TWO
Now open Eclipse, it will prompt you to select a work space location where it could save its data, so click browse and choose the same folder which you created in the step one.
Note:- make sure you create folder for eclipse work space every time in the same location beside your android project.

STEP THREE
Now, when eclipse finishes loading its components, you will be redirected to a welcome page, close that by clicking the top right X mark on that TAB page. And when you do, everything will be shown blank white.

STEP FOUR
Now click "HELP" option on the top and select 'Install New Software' option in the drop down menu. After that, another window will open and look around it, you will see an "ADD" button on the top right side of that window. Now, click that button and it will open another small window which will ask for Name and Location. In name, you just type any thing you like but i prefer you should name it small like "Tools". And now, in Location, you have to type the address of the Google Eclipse Plugin Files, which is this
https://dl.google.com/eclipse/plugin/4.4
But make sure, your eclipse verison is 1.7.0 or later to install these tools.
Now, click the OK button and wait till the components load.

STEP FIVE
After the components loads, you will see a list of tools with different names, so you should select all by clicking the "Select All" button below the list and then click "Next" button located in the lower right side of that window. Now, just follow the "Next" button and accept the terms then in the end click "Finish" button.

STEP SIX
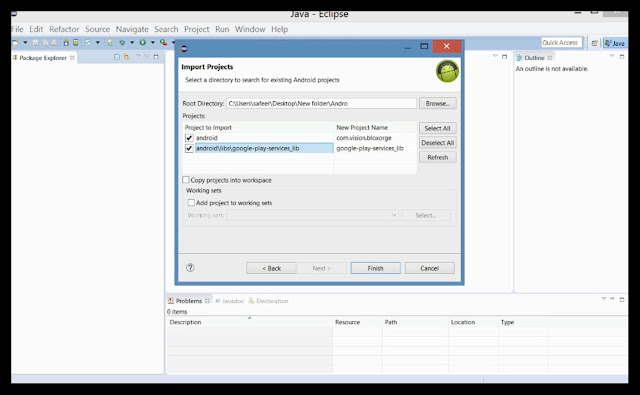
Now you are done with the tools. You will have to wait till these tools install. Now on your Main Screen of your eclipse, click "File" option on the top left side of the window and click "Import" button from the drop down menu. You will be prompted to choose option from below list, you should select "Android > Existing Android Code Into Workspace" and then click the "Next" and in the next window, click "Browse" button and choose the folder where both (your work space folder and your android project folder) are located. Then, you will see two files with tick on them appear on that windows, you just make sure they are ticked and then click "Finish" button.
STEP SEVEN
Now that your files are loaded, you will see some errors in it,but don't worry.
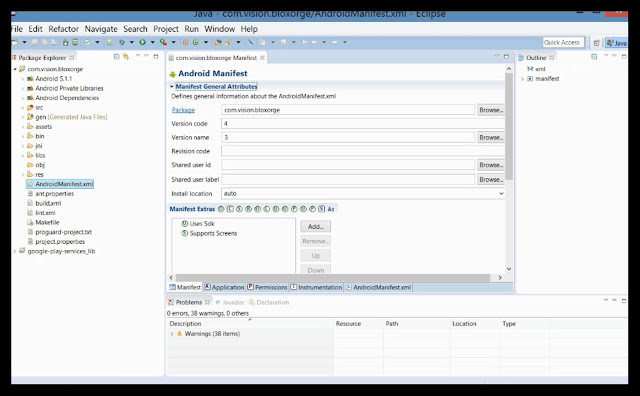
Now, just open the "com.name.app" drop down in the left side bar of the eclipse and double click the "AndroidManifest.xml" file, you will see the changes in your front window where it will be written Android Manifest at the top. Now, just change the Version Code and Version Name, make version code to 1 and Version name to 1 also. You will see some package errors, if you have made an android game in BuildBox game creation software, you will see some package errors other wise in most cases you don't.
So if your project is created in Buildbox, then you must have the BuildBox project file saved, open that in the BuildBox and in settings, just write your package name in bundle id and then export it to Android and then repeat the process with the different work space folder in that project.
STEP EIGHT
Now after you made changes to your Android Manifest, then just click the save button imaged as small floppy drive on the top left side below "File" option. And then, click "File" option again but this time you choose "Export" option from the drop down. Now after you choose that, you will be prompted to the same screen as when you imported your project, just slect "Android > Export Android Application" and then you will see a follow up window where you have to follow the instructions, then just check if you got any errors there but you should be clean and you should be able to proceed next. And then, you will be prompted to choose a keystore or create new one, you just tick the create new one option and set its location where ever you want (desktop preferred). And then click "Next" button.

STEP NINE
Now in the next windows, you will see Key creation window, you will have to write your information on that screen and then proceed Next and then you will see the option to where to save your Android Application, just click "Browse" and choose your desired location (desktop preferred) and then click "Finish" button and wait till it saves the file. Make sure you name your application with a (.apk) extension before clicking the "Finish" button or otherwise if you accidentally do it without (.apk) extension then, you will have to repeat the step seven and eight again.

STEP TEN
Now, you have successfully created your APK File of your Android Project. Locate that file and copy it on your device and install it and test it right now to check for any mistakes before you publish it to Play Store.

SOURCES
 Eclipse Mars Package Latest
(OFFICIAL FROM VENDOR'S WEBSITE)
Google Plugin For Eclipse Info
(OFFICIAL FROM VENDOR'S WEBSITE)
VIDEO TUTORIAL
Video tutorial is best way for beginners to learn more accurately. Download any quality which suits you best and watch it anywhere , anytime. There are many benefits of video tutorial, it gives the student a live feel of problem solving and with real life on screen instructions, students can understand more easily and properly. All files are uploaded on Microsoft OneDrive and are scanned completely. For great experience, watch it in 1080p Full HD.


INFORMATION
This How-To was written by Safeer Ahmed , this tutorial is for those who are beginner in Android Application Development , though it is a pretty basic thing which is quite ignored by many beginners and so in the end it brings up problems in their development.

So many of you must be developing something great and powerful as a beginner but you are worried about how to convert your android project into an APK file. I know it is the most basic part which makes your app useful and it sounds easy, but many game creation software doesn't export your project directly into an APK file, they just export the Android Project Files with resources and all your stuff in it separately. APK is what makes everything one and enable your Android to read that and install that as an application. And so, without getting any further, here we begin.INTRODUCTION
Here i will be using Eclipse Luna (android application maker tool by oracle). You might have heard about Android Studio by Google but it is a heavy tool and is a bit complicated for beginners though the future will be based on it after all but always start with the basics.
STEP ONE
Okay, first of all, locate your Android Project folder and create another folder inside it and name it as 'WorkSpace" or any other name you like. Do not create the folder where your data and resources of your project are located, outside of that folder BUT along with the folder in which your data is stored.

STEP TWO
Now open Eclipse, it will prompt you to select a work space location where it could save its data, so click browse and choose the same folder which you created in the step one.
Note:- make sure you create folder for eclipse work space every time in the same location beside your android project.

STEP THREE
Now, when eclipse finishes loading its components, you will be redirected to a welcome page, close that by clicking the top right X mark on that TAB page. And when you do, everything will be shown blank white.

STEP FOUR
Now click "HELP" option on the top and select 'Install New Software' option in the drop down menu. After that, another window will open and look around it, you will see an "ADD" button on the top right side of that window. Now, click that button and it will open another small window which will ask for Name and Location. In name, you just type any thing you like but i prefer you should name it small like "Tools". And now, in Location, you have to type the address of the Google Eclipse Plugin Files, which is this
https://dl.google.com/eclipse/plugin/4.4
But make sure, your eclipse verison is 1.7.0 or later to install these tools.
Now, click the OK button and wait till the components load.

STEP FIVE
After the components loads, you will see a list of tools with different names, so you should select all by clicking the "Select All" button below the list and then click "Next" button located in the lower right side of that window. Now, just follow the "Next" button and accept the terms then in the end click "Finish" button.

STEP SIX
Now you are done with the tools. You will have to wait till these tools install. Now on your Main Screen of your eclipse, click "File" option on the top left side of the window and click "Import" button from the drop down menu. You will be prompted to choose option from below list, you should select "Android > Existing Android Code Into Workspace" and then click the "Next" and in the next window, click "Browse" button and choose the folder where both (your work space folder and your android project folder) are located. Then, you will see two files with tick on them appear on that windows, you just make sure they are ticked and then click "Finish" button.

STEP SEVEN
Now that your files are loaded, you will see some errors in it,but don't worry.
Now, just open the "com.name.app" drop down in the left side bar of the eclipse and double click the "AndroidManifest.xml" file, you will see the changes in your front window where it will be written Android Manifest at the top. Now, just change the Version Code and Version Name, make version code to 1 and Version name to 1 also. You will see some package errors, if you have made an android game in BuildBox game creation software, you will see some package errors other wise in most cases you don't.
So if your project is created in Buildbox, then you must have the BuildBox project file saved, open that in the BuildBox and in settings, just write your package name in bundle id and then export it to Android and then repeat the process with the different work space folder in that project.

STEP EIGHT
Now after you made changes to your Android Manifest, then just click the save button imaged as small floppy drive on the top left side below "File" option. And then, click "File" option again but this time you choose "Export" option from the drop down. Now after you choose that, you will be prompted to the same screen as when you imported your project, just slect "Android > Export Android Application" and then you will see a follow up window where you have to follow the instructions, then just check if you got any errors there but you should be clean and you should be able to proceed next. And then, you will be prompted to choose a keystore or create new one, you just tick the create new one option and set its location where ever you want (desktop preferred). And then click "Next" button.

STEP NINE
Now in the next windows, you will see Key creation window, you will have to write your information on that screen and then proceed Next and then you will see the option to where to save your Android Application, just click "Browse" and choose your desired location (desktop preferred) and then click "Finish" button and wait till it saves the file. Make sure you name your application with a (.apk) extension before clicking the "Finish" button or otherwise if you accidentally do it without (.apk) extension then, you will have to repeat the step seven and eight again.

STEP TEN
Now, you have successfully created your APK File of your Android Project. Locate that file and copy it on your device and install it and test it right now to check for any mistakes before you publish it to Play Store.

SOURCES
 Eclipse Mars Package Latest
(OFFICIAL FROM VENDOR'S WEBSITE)
Google Plugin For Eclipse Info
(OFFICIAL FROM VENDOR'S WEBSITE)
VIDEO TUTORIAL
Video tutorial is best way for beginners to learn more accurately. Download any quality which suits you best and watch it anywhere , anytime. There are many benefits of video tutorial, it gives the student a live feel of problem solving and with real life on screen instructions, students can understand more easily and properly. All files are uploaded on Microsoft OneDrive and are scanned completely. For great experience, watch it in 1080p Full HD.
INFORMATION
This How-To was written by Safeer Ahmed , this tutorial is for those who are beginner in Android Application Development , though it is a pretty basic thing which is quite ignored by many beginners and so in the end it brings up problems in their development.
AUTHOR

No comments:
Post a Comment
Please do not create any sort of violence or use any kind of abusing words, or else an action will be taken.